

 Pinterest has become one of my favorite forms of social media, and I came across this pin last year. What a clever use of mismatched butter knives! You could imagine the delight of your guests finding these on the holiday buffet table. Naturally this led me to start collecting vintage butter knives at flea markets and antique malls on my days off. It's surprising how cheap they are--rarely more than $5, unless they are particularly ornate and sometimes not even then. Then I ordered a set of metal stamps and a heavy metal bench plate off of Amazon---I already had several sizes and types of hammers backstage. Naturally I looked online for a tutorial: click HERE to see a particularly detailed one.  So here are some of the knives I've stamped recently. Obviously I need some practice at getting things in a perfect line, but the people who have received these from me haven't complained so far! I'm mostly making them for door prizes for my bread demos (check out the Upcoming Events Page page to find out if I'll be near you anytime soon) but have also sold a few at events where I was selling books and abbey products.  While I was exploring metal stamping on Pinterest I also came across some pins about spoon jewelry, and since I make rosaries and already have all the tools and equipment for that craft, I decided to try my hand at it. Not bad for an amateur's first try! I gave this pendant to a facebook friend as part of my Pay It Forward initiative, which I wrote about back in February (click HERE to read about it). I don't think I'll be doing as much of this kind of work as the butter spreaders, but it might inspire you to get out those mismatched spoons in the drawer and transform them. By the way, silver and silverplate work well for this sort of thing, but not stainless (too hard and slippery, I think).
0 Comments
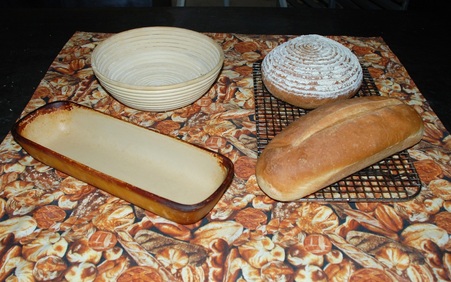
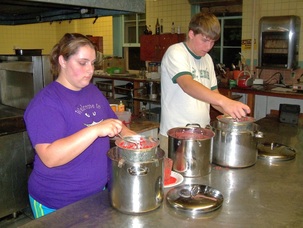
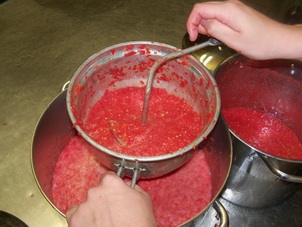
 In honor of National Doughnut Day, I got up the morning at 4:30 a.m. (surprisingly easy when you go to bed at a decent hour) to make old-fashioned cake doughnuts for the brethren. I felt a certain moral obligation to perform this service because I had mentioned the holiday in a homily earlier in the week. Fortunately, I have the perfect equipment: a commercial deep fryer and Popeil's Donut Maker. As you can see from the photo, this little mechanism is vintage kitchen ware from the 40's. They came in red, yellow, and green plastic, and they were still making them in the 70's. I've seen a number of them at garage sales and antique malls and there are lots of them on e-Bay. They were recently revived by Ronco (I believe Ron Popeil is the son of the original manufacturer) and you can get one on Amazon for $5.95 right now (click HERE).  I used the original recipe from the box, except that I used canola oil instead of shortening, both for the recipe and for frying. I got great results, but here are some precautions: 1) Do not "scoop" the flour when you measure it. You'll compact the flour and end up using too much. Use the "spoon and level" method. 2) When you depress the level to dispense the batter, hold the device just above the hot oil so that the doughnut doesn't get distorted and you don't splash hot oil all over. 3) The batter will be a little thick and will come out of the dispenser rather slowly. Resist the temptation to add more milk to the batter, or you will risk having doughnuts that look like mutated DNA. This is a matter of personal experience. You will be surprised at how good a fresh, homemade doughnut can be, even when unadorned by sugar or frosting. You will also notice that the doughnuts are much more modestly sized than most commercial doughnuts today. That's a good thing--you eat a couple of these and you feel like you've had a well-deserved treat rather than enduring a sense of dietary failure and bloated guilt. I doubt I'll be making doughnuts every week, but as a special treat they are well worth the effort.  After a demo I'm often asked about the tools I use, and some Breadheads who attended my Eureka demo asked about them. The polka dot rolling pin was made by my father, using cherry wood with maple inserts. It's a little bit wider than standard rolling pins, and not quite so big around. It took me awhile to get used to a pin without a center rod---one solid piece of wood---but now I prefer it, in part because it allows you to push as hard as you want on stiffer doughs. I keep trying to convince my brother to take up the mantle and start turning these on the lathe he inherited from dad's shop--we'll see. The center tool is a brotpisker or Danish dough whisk. It's the best utensil around for mixing bread dough, muffin batter, cookie dough, cornbread, waffles---any time liquid and flour meet in a bowl. My mom got my dough whisk for a quarter at a rummage sale in 1979, and I've used it to mix up thousands of batches of bread dough. They're available online from several sources, including King Arthur Flour, Amazon, and Sur La Table. They come in two sizes (14" and 11") but I'd just get the larger one, unless you never mix anything but pancakes.  Only paid $19.99 at the local Ace Hardware, so wait for a sale. Only paid $19.99 at the local Ace Hardware, so wait for a sale. The other useful utensil in my toolbox (and yes, I keep my baking gadgets in a DeWalt toolbox) is a flour wand (see photo above): a tool made of wire with a squeeze handle and a spring coil on the end. Also called a Flour duster, it was first developed in Victorian times when pie making become especially popular. When the handle is squeezed, the spring opens up, which is then swirled in the flour container. Releasing the handle traps the flour in the coil, which is then shaken gently to sprinkle just the right amount flour onto the counter top. If you’ve ever had both hands covered in raw pie crust or sticky bread dough and have been reluctant to reach into the flour canister, you’ll understand why this tool is particularly valuable. They are available in some specialty shops and on several websites online, including the ones mentioned above. However, I recommend that you pay a little more and buy one from Best Manufacturing of Portland, Oregon. There are cheaper models out there, but theirs is far better-made and long-lasting. The price ranges from $10 to $17 on Amazon, so you can put it on a wishlist and wait for the price to go down. Can you be successful at baking without these specialized tools? Sure---thousands of generations of bakers did just fine with wooden spoons and a wood burning stove. But they can make your baking experience easier and more enjoyable, and the pleasure that comes from using a well-made tool makes me want to bake more often, and none of my brother monks ever complain about that!  When people think of "bread pans" it's usually an image of metal retangular loaf pans that comes to mind. But there are plenty of lovely alternatives to the classic sandwich loaf shape, and I made a couple of them this Thursday using leftover pizza dough. (I would like to insert here a parenthetical comment about the pizza dough that night---I added a bit of gluten powder to the dough, used a bit less flour than the recipe called for, and kneaded it longer than usual. The dough was mixed with cold ingredients and left to rise slowly from 4 p.m. until 8 p.m. The results were outstanding. The dough was both crisp on the bottom and chewy on the outer crust, with a slight char on the bubbly parts. Hope I can reproduce those results!) I deliberately made extra dough so I could have a couple of loaves of bread as well, one for monk breakfast and one as a thank-you for a friend who had done me a favor. The loaf with the flour swirl on top was produced using the round basket, known as a banneton in France and Belgium and a brotform in Germany. The inside of the basket is genrously dusted with flour and the ball of dough is placed in it for its final rise or proof. This basket can hold up to 2 1/2 pounds of dough, although this loaf was only 1 pound, 10 oz. After the loaf has nearly doubled in volume and the oven preheated with a baking stone, the loaf is tipped out directly onto the stone. In an alternative method (which I prefer) a wooden peel or paddle is placed over the basket, the basket and peel flipped over and then the basket removed. The peel is then used to ease the loaf onto the baking stone. In either method, you have to take care not to handle the loaf roughly or it will deflate. As you can see, it produces a stylish loaf that looks like something you'd find in a shop in Provence! The other loaf was baked in the stoneware loaf "pan" pictured at the bottom left of the photo. It's made of unglazed stoneware, and once it's been used a few times it becomes utterly non-stick and produces a lovely crust because it distributes heat so evenly and helps pull off moisture from the loaf. The pan is set directly onto the oven rack, and like a pizza stone. should never be washed with soap, only wiped off with a damps cloth. Stoneware pans can be pricey, but I think they're worth the invstment for a true Breadhead. Pampered Chef has a line of them in a variety of shapes, as does The Baker's Catalog (King Arthur Flour). However, I've not seen this longer pan in recent catalogues. Br. Luke is bringing in about 20 pounds of tomatoes every day, so it's the time of year I start thinking about storing the harvest from my herb garden, which I generally do by canning them in the form of pizza sauce. (The only other herbs I store are fennel seed and hot peppers, which I dry and grind up for hot Italian sausage, but that's for another post).  So I took about 50 pounds of tomatoes, washed and cored them, cut them into quarters and ran them through the food processor for a rough chop. Then, as I often do for larger culinary endeavors, I enlisted the help of my Stage Rats, who ran the tomatoes through a Foley food mill, which yielded a pulpy, fragrant tomato puree.  Every kitchen ought to have a food mill, which can rice, grate, mash and puree foods while removing skins, peels and seeds. Mothers use them to make homemade baby food, canners use them to process fruit for jams and jellies, and they're handy for applesauce and even cracker crumbs. They can be a bit fussy to clean and a food processor might be more efficient for some jobs, but its ability to screen out skins and seeds makes them a valuable tool. Unfortunately, a food mill will set you back anywhere from $35 to $80 when you buy them new, so I recommend you keep an eye out at garage sales, flea markets and the Goodwill store. I've gotten all of mine (I own four of different sizes) for less than $10 each. Look for a mill that isn't too rusty or dented. The center shaft should turn smoothly without being wobbly, and the interior blade should press firmly against the screen. Get the largest you can find and afford, and pretty soon you'll be making homemade applesauce without having to peel all those apples!  We finished processing the tomato puree about 9 p.m., so after some discussion the Rats and I determined that we ought to make homemade donuts, featuring some real vanilla that one of them brought back from Mexico for me. Naturally I had an old-fashioned donut batter press (made by the Popeil Bros., the predecessor of Ronco) obtained at a flea market for 75 cents, so we fired up the Fry Daddy and had a grand time. Notice the modest size of old-fashioned donuts---much more reasonable than the tractor tire-sized treats in many bakeries. Next experiement: red velvet donuts with cream cheese frosting---I promise I'll share the recipe! This afternoon I'll add some wine and garlic to the tomato puree, reduce it to the correct thickiness and add fresh minced basil, oregano and rosemary, salt and pepper. Then we'll crank up the biggest steam kettle to can about 20 quarts of pizza sauce tonight. Is my life great or what? UPDATE AT 10:30 p.m. The pizza sauce turned out to be very flavorful indeed (plenty of herbs, practicially a whole bulb of garlic in 16 quarts) but far sweeter than usual, although I didn't add any sugar. So I suspect that's due to the type of tomatoes Br. Luke grew this year, which I have found to be deliciously sweet in a salad or on a smoked turkey sandwich, but I'm not sure how it will play out on a pizza. Secondly, I tried a recipe off the Internet for red velvet cake donuts, and it did not turn out at all. I won't reveal what company website I found it on, but let me say that Queen Guenivere should be looking for a new baker. The cream cheese frosting rocked, so if we can find a red velvet recipe to match, we'll be in business. I may try baking the donuts instead of frying, since I have the special pans needed for that. Somewhere . . . |
AuthorFr. Dominic Garramone AKA Categories
All
Archives
June 2024
|